Turning a Patch of Lawn into a Vegetable Garden, Part 5
There’s an old axiom that to be a good builder you need to learn to think like a drop of water. Farming and home gardening can be similarly reduced to: you need to learn to think like a weed. There’s hundreds of years worth of cultivated plant knowledge at our fingertips, and expert growers who can tell us exactly what each garden plant wants and needs. But unless we’re growing in the controlled conditions of a greenhouse, this knowledge is partial at best. Out in the cruel, bare dirt of our short Vermont summer, the art of eliminating competition is where the garden is going to be made or broken.
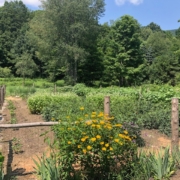
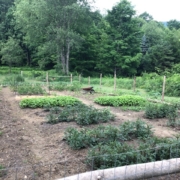
We’re working on a story for Volume II about all this; talking to professionals about their tricks of the weed-killing trade. But in the meantime I thought I’d share some thoughts from my own garden this year in the hopes that they’re useful to other backyard growers who might be new to this. The plot is 1,800 square feet, and this particular garden is two years old. So far I’ve been able to keep on top of the weeds, and to quote the late Kenny Rogers, knowing when to hold ‘em and when to fold ‘em is probably the biggest reason.
I kept my cards folded all of last year. I broke ground in the spring of 2020, but then cover cropped instead of planting. This plan was based on respect for the established perennial vegetation that was being plowed under, which was going to rise again. It didn’t come to dominate that particular patch of ground by accident. This garden was built on a lawn, so crabgrass was the toughest plant of the bunch. But in a weedy meadow out back, in a different planting I did at the same time, the endemic goldenrods, milkweed, and fern all pushed back in a similar way. Patience was key. Had I tried to grow before the sod had broken down, it would have been a nightmare to fight the crabgrass. By spending a year letting the soil mellow while smothering the weed base, I was able to start the weed fight this year in a position of strength.
This year’s weed control efforts started right away, which is another piece that seems key. If I’d waited until the weeds looked like garden plants, I’d have lost the edge and it would have become real work. The truism here is that if you’ve got a weed-free garden in July, it’s because you put the time in in April and May.
Weeding the 1,800 square feet in this garden probably took a couple hours a week in June, but I’m probably down to an hour a week now that the plants have taken off. I do 20 minutes a morning on my way to the chicken house. I don’t squat unless I absolutely have to, and do 95% of the weeding standing upright with this tool.
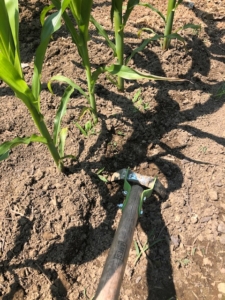
I’ve heard them called a bunch of names, including a loop hoe and a push-pull weeder. It’s basically just a two-sided blade that you can work while pushing or pulling. If you hit the crabgrass when it’s this big:
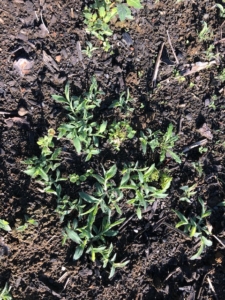
You can kill it with one hand. Those same plants, three weeks from now, would require hand digging.
As I planted, I made sure all the rows were wide enough to accommodate the tool – I use it as a cultivator, too, when the beds are just getting established. I don’t cultivate the paths that are in between the beds deeply – the paths are permanent and I don’t mind soil compaction here. When weeds grow in the paths, I run the loop hoe over lightly so they’re cut near surface level because I don’t want to dig in deeply and aerate the soil and stimulate microbial activity.
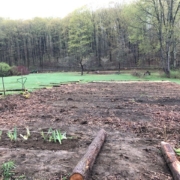
Any place in the garden that didn’t get planted this year but might someday got covered. In some beds that meant planting buckwheat or sunflowers, which grow fast and dense – they’re placeholders that bees and birds love. Other areas got covered with old newspapers and then any biomass I had lying around, like old leaves or planer shavings. The point was to eliminate bare dirt as much as possible.
The danger of these kinds of pieces is that the writer can come off as smug – it’s like the way Facebook makes everyone’s life seem more photogenic and perfect than it really is. So let me assure you, this garden has plenty of imperfections. I mulched a bed of peppers with newspaper and planer shavings in late May, and I think I set the plants back at least 2 weeks because the soil temperature couldn’t get warm enough under the mulch. I didn’t look closely at the straw I used last fall to mulch garlic, and the weed seeds in it – weeds I don’t recognize – have been a pain to deal with all summer. That was very much a self-inflicted wound. I could go on.
Still, I’m happy with how things look, and I hope there’s something helpful here for people who are new to all this.
Turning a Patch of Lawn into a Vegetable Garden, Part 4
I’m working on a piece about soil fertility for Volume II of the Almanac, and part of my background research involves reading a book the late Jack Lazor wrote on grain growing. Lazor broke soil fertility down into three interdependent realms: the chemical, the physical, and the biological. And he made the point that conventional agriculture can be exploitive and short sighted when farmers just focus on the chemical. Through Lazor’s organic lens, soil is an ecosystem where billions of microorganisms “work in conjunction with a soil’s mineral and humus factions to feed themselves and the plants that grow there.” High levels of organic matter mean happy microbes and happy plants, and so growers use compost and cover crops and manures to grow soil before they grow plants. In a conventional system, farmers just add chemical nutrients from a bag, and without mitigation measures, the organic matter in this soil is depleted.
Farmers transitioned away from organic practices for financial reasons. And in theory, us home gardeners have the luxury of being able to do better because we don’t have a profit motive. And yet it’s so hard, even for us, to escape the chemical mindset; the allure of magic in a bag as opposed to the hard work of incorporating three yards of compost with a shovel and pitchfork.
I think part of the problem here is that we’ve been conditioned to see fertilization as an act of care. We’re feeding our plants from the bag. And chemical fertilizer works. If you go out and sidedress your plants with some Scott’s 10-10-10 this week, and we get adequate rain, they’re going to pop. Lazor points out that the soil carbon is burned up in the process of converting the fertilizer to Nitrogen, and over time soil is hardened by modern fertilizer. But this is a problem years in the making, as opposed to results that are immediate and easy to see. And if one plant food takes seconds to apply, and the other hours and days, then why not push the easy button?
I think a better way to get through to home gardeners about the benefits of organic amendments is to highlight the way organic soils hold water. In my experience, water retention, not fertility, is the miracle of compost. That’s the reason to do the hard work. For every one percent increase in organic matter, an acre of soil will retain an additional 160,000 gallons of water. And as the climate changes and weather gets more extreme, home gardeners are going to be dealing with dry conditions more and more. It’s easier to get nitrogen from a bag than from compost, but it’s easier to mix in compost once a year than it is to lug a watering can around to every plant all summer.
I laid out this garden with a center hallway, then used a broadfork and hand tiller to elevate beds. (Because this was a lawn that’s been mowed for decades with a riding mower, it’s pretty heavily compacted.) I borrowed a truck trailer and bought 2.8 yards of compost, which I incorporated into the top layer of the beds. That’s all I did to make the beds. I didn’t raise them because I want the plants to be able to work their roots down into the cool reservoir of the earth. As I add compost each year, they will naturally raise themselves.
So far this year it’s been relatively dry. And I’ve done no supplemental watering. Still, the dirt’s inherent 4.6 percent organic content (this figure from the initial soil test) and the compost I added have allowed the plants to take hold and take off.
Turning a Patch of Lawn into a Vegetable Garden, Part 3
It’s time to figure out a fence for the garden, and the options seem endless and imperfect. I’m going to want to keep cottontails, woodchucks, deer, and birds out, and so the logical solution is a 2,000-foot cage. Of course I also want an aesthetically pleasing place to be, so right away the practically-perfect is the enemy of the good.
In past gardens I’ve used single-strand electric fence, three courses high. And it worked well for deer. I’d smear peanut butter on the wire to train them. Each fall the fence came down, and each spring a tractor could till, unimpeded. The downside was that it wasn’t effective for cottontails or woodchucks, who could go right under. And it was a pain to weed-whack, which is important because the grass growing up into it shorts the electricity. And I want to try to not use a tractor anymore, so the fact that I can remove it easily is no longer as big a plus as it was.
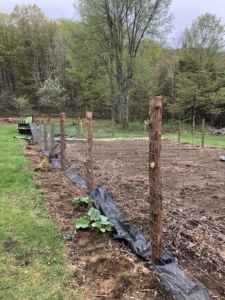
So I decided to go the classic welded 2 x 4 wire route. The pros are that this fence thwarts woodchucks and bunnies. The structure can also be nice, either as a means of growing vertically or as a way to help suspend bird netting over vulnerable crops. The downside, besides the fact that it’s labor intensive to build and maintain, is that it still leaves you with a deer problem. They can jump 8 feet, and so to really keep them out you’d have to run two courses of 4 foot wire and turn the whole plot into a prison cell.
I’m hoping to get around this by running one 4-foot course of wire, then messing with the deers’ depth perception, an idea codified by UVM’s Leonard Perry in this online article. If I put 45 degree kickers on the corners which will go out and up, away from the fence, I’m hoping that maybe a single strand of wire will leave them hesitant to jump.
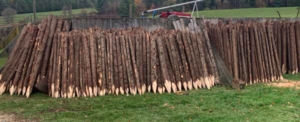
Once the decision on fence style was made, it was time to source posts. Cedar makes good posts. Locust makes good posts. Unfortunately, I have neither of these species growing on the back 40. So I went online and found Ed Fox, a farmer in Pittsford, who was selling freshly cut white cedar posts for $5.50 each. This seemed like a good deal to me. Plus I got to use Vermont wood and put the cash money right in his pocket instead of in a register at a big box store. After loading them on a trailer, he watched with amusement as I tried to tie them down. “If you get pulled over, just say you’re a farmer and you’ve got enough problems,” he said.
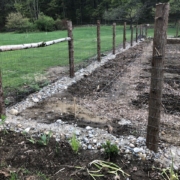
Once home I dug 28 roughly 2-foot-deep holes that were between 6 and 10 feet apart. I backfilled each hole with gravel that I dug out of a sandpit on the property that was originally used by the state to improve Route 7A when it was paved in 1931. I ran a course of wire down the long side of the rectangle, then I put a 12-16” strip of landscape fabric in between each post and under the wire, which was then covered with gravel. I don’t want to have to fight weeds.
I bought the welded wire from Poulin’s feed store, which used to be Whitman’s feed store. Art and Kathy Whitman were pillars of the Ag community for many years in Bennington County and were supporters of Volume I of the Almanac. I point out these details because rural economic life is an ecosystem, and if we don’t support each other, we all suffer.
I reinforced the corner, then stapled the wire onto the first fence post. At the other end, I cut a disposable 4-foot limb, stapled that to the other end of the course of wire, attached the limb to the tractor bucket with a chain, then used the tractor to apply tension to the wire. It worked fine for a home garden. No need for the fancy fence pullers that the professionals use.

Turning a Patch of Lawn into a Vegetable Garden, Part 2
Year two of the garden project started with a decision: was I going to keep using a tractor to work the earth?
Like many of you, I grew up thinking that you needed to deeply till the soil to grow things in it. As a boy, I remember being beat up by the family roto-tiller, the thing pitching me around like a bull as I tried to hang on to it. In my twenties I worked on a vegetable farm, and we basically used the same techniques as we used in the home garden, just with better equipment. Every spring, we broke the earth with a three-bottom plow. We then disked, then spread manure, then used a tractor-mounted tiller to make fluffy beds. The soil was so soft and loose when you were done that you wanted to lay down and take a nap in it.
Of course the downside to soft, loose dirt is that there’s no structure anymore, which leaves the soil vulnerable. Without a plant layer to act as a roof, topsoil can dry out and blow away, rain water gushes in instead of trickling in, ecosystems full of mycorrhizae and microbes and insect life get all smashed up. A no-till farming/gardening advocate would tell you that the plow is a pariah, and best practice involves keeping dirt as green as possible for as long as possible, then work only the top few inches of soil, leaving the subsoil as intact as possible.
We want to dig deeply into the topic of soil in Volume II of the Almanac, talk to some growers with different perspectives on best practice and report what we hear. My sense is that it’s not a case of right or wrong, it’s a matter of scale, technique, available resources, and what trade-offs you’re prepared to make.
In the meantime, where it comes to this garden, I decided to pursue a modified no-dig approach. Instead of plowing and disking this year, I simply scratched the soil surface with a York rake to break up the dead buckwheat litter. I blew my budget by investing $100 in a broadfork – basically a pitchfork on steroids that lifts compacted soil. And I borrowed a twist tiller, which is a tool you plunge into the earth and twist to break up a planting bed. If the hand tools work, I’ll be able to recoup much of the cost by selling the old roto-tiller that sits in my garage.
At Work With Vermont Evaporator
When we see the Made in Vermont stamp on an agricultural product, we view it as a badge of quality. We probably know the town where it’s made, and might even know the people who made it. We can assume that it’s produced in relatively small quantities, and can imagine the care that went into its production – something we rarely expect in mass-produced products. The same is true with durable goods, and that’s part of what makes Vermont Evaporator such a cool story. This Made in Vermont item is itself much like the syrup it produces: hand-crafted with pride in small batches.
We caught up with Vermont Evaporator founder Kate Whelley McCabe to find out what goes into making each of company’s flagship Sapling evaporators. She provided this series of photos and walked us through the production process at Vermont Evaporator’s Montpelier headquarters.
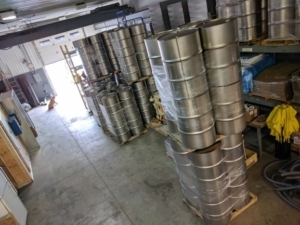
“We special-order new, unpainted and unlined, 55-gallon steel barrels,” Kate explained. Most barrels sold are treated inside and out to protect the metal or the contents being stored. “But we’re not using the barrels to store something; we’re using the barrels to do something,” she noted. She added that most barrels are standardized by volume size rather than height and width; but in order to standardize the manufacturing process (the jigs used, the boxes for shipping, etc.), Vermont Evaporator has to be very careful to be sure they are getting barrels with exactly the same dimensions every time. (Also in the photo: Oliver, the shop dog, guards the door.)
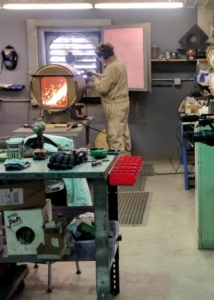
The new barrels are placed in a jig and cut using a plasma cutter; the heat from the process lights up the inside a bright red as the employee makes the cuts. “Behind him is a giant fan that removes the fumes,” said Kate. “And we’re sure that all of our employees wear all of the necessary protective equipment.”
In this photo, the front door of the evaporator has been cut out, and the top opening where the pan will sit is being cut. An opening on the back for the smokestack will also be added.
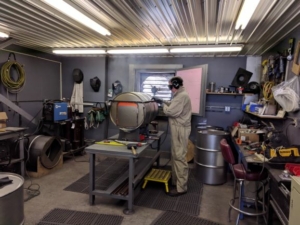
Here, in an artistic shot that Kate said could be called “Portrait of a Barrel,” all of the cuts have been made. A frame to hold the pans has been attached along the sides of the top opening. And now it’s time for the “media blasting” – this essentially sands the barrel to prepare the surface before a coating is applied. “Instead of sand blasting, we use aluminum oxide,” said Kate. The employee dons fully protective PPE, including a helmet/mask with clean air supply hose before entering the blasting room to begin the process.
Vermont Evaporator achieves a durable protective coating for its evaporators without using a typical paint. “The wet part of paint is a solvent, and that’s actually the toxic part,” Kate explained. Instead, the company uses a dry particulate [often called a powder coating], which is blown onto the barrel. Here, the soon-to-be evaporator is being removed from the high-temperature oven that “cures” the powder coating.

At this point, the pieces all come together. This evaporator, which is sitting up on its back end for assembly, has been outfitted with a door frame and door, as well as the company’s emblem. A vent will be added (the holes for it are already cut).
One part of the evaporator that’s not manufactured in Vermont is the stainless steel pan in which sap will be made into syrup. “We sourced everything in Vermont at first, but the company that made the pans unfortunately went out of business,” said Kate. “But we kept in New England – the pans are currently coming from the Springfield, Mass., area.” Vermont Evaporator looked into producing its own pans, but the materials involved require highly specialized equipment and expertise. “Our pans are food-grade stainless steel with lead-free welds. Stainless is a whole different beast; we’re talking about hundreds of thousands of dollars in equipment and highly specialized skills.”
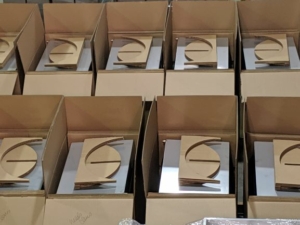
Almost ready: These saplings are boxed and ready to go, with hand-written notes indicating the final pieces needed before shipping. Since Covid, customer pick-ups have been impossible, so all Vermont Evaporators are now shipped; this critical part of the process is expensive and requires careful packing and a lot of attention to detail, said Kate. It’s also another area where the special nature of doing business in Vermont pays off. “UPS is really good at their job. And I’ve built up a good rapport with our driver over the years,” she joked. “I’m talking making him Christmas cookies! We’ve worked out a system where he knows when we have boxes that really need to get out. Personal relationships really help.”
No Salvage, Only Song
Our friend Verandah Porche shared this New Year’s acrostic with us. You can also find more of her work here.
For the 52 years we’ve lived here, the barn stood
for everything that mattered: animals named,
tended and eaten, lovers, then children in the hayloft,
plays performed, weddings, and funerals.
We sought advice about saving our loved barn,
but the price was wrong and the livestock were gone.
A local contractor with a crane will finish what
the wind began. And the future landscape will take shape,
for all of us.
2021: NO SALVAGE ONLY SONG
Haphazard gifts…
A neighbor’s whip of forsythia
Proliferated. In this thicket, a cardinal
Pivots, chest puffed, barn-redder than
Your heart. Listen for his forked cheer,
Now barely audible under the squall.
Each burst peels the barn from the bird
Who doesn’t waver: no salvage, only song.
You want it over: the shape that sheltered
Every creature, the year we flinch from touch.
After grief, let unroofed heaven gentle down.
Raise sweet corn in the manger. Scatter seeds.
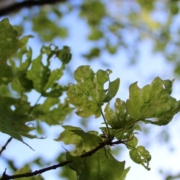
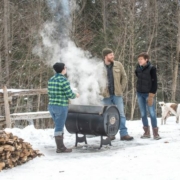
A Good Year For Pear Thrips
This has been one of those years that really brings the timing of spring into focus. We had a pretty warm March, followed by a pretty cold April. (April averaged out at 3.2 degrees below the long-term normal in Saint Johnsbury.) This cold continued into May, a month that featured several unprecedented cold-weather events, including that 8” snowstorm on the 9th. The sugar maple leaves had broken bud earlier that week in southwestern Vermont; the ones in our sugarbush then endured the snow and three nights where the temperature fell into the upper 20s.
I’ve been monitoring the frost damage since then (which is to say periodically walking around with binocs and jotting down general observations). And it’s not as bad as I feared it might be. Certain trees had certain leaves succumb – maybe 10-15 percent in the worst cases. I couldn’t find a pattern as to why certain trees took it harder than others.
A bit more discouraging is the pear thrip damage I’m seeing. On most years, these non-native insects are not that big a deal. But during drawn-out springtimes like this one, when the buds break but then cold weather delays leaf expansion, the damage can get ugly. In some cases the tiny insects cut the compressed leaf with their sharp mouthparts – when the leaf fully opens, the effect is similar to when you fold a piece of paper and cut a snowflake pattern into it with scissors. In other cases they scrape and damage the plant tissue, which leads to stunted, curled, mottled leaves. If you’re wondering what they look like, you can see a picture here: We don’t often see them because we don’t often look; also because they spend most of their life underground.
In my surveying, some trees look fine, some look moderately damaged, some – especially unhealthy and small trees – look bad. I won’t know the extent of the damage until the canopy is fully developed.

Mottled, disfigured leaves.